Setting Up Neovim, NVChad, LSP, and GitHub Copilot on MAC or Linux
1. Install Neovim
- Download the AppImage from Neovim Releases.
- Make it executable:
chmod +x nvim.appimage
- Move it into your
$PATH(e.g.,/usr/local/bin):
sudo mv nvim.appimage /usr/local/bin/nvim
Make sure /usr/local/bin is in your $PATH.
Note: AppImages are just one of several methods to install Neovim on macOS or Linux. Feel free to use any installation method that ensures you get the latest version.
2. Install NVChad
Follow NVChad’s quickstart.
Make sure any pre-requisites are installed like NerdFont and ripgrep. Installation instructions are linked for those in the link above. Note: Personally, I use iTerm2 on my MAC with the NerdFont “FiraCode Nerd Font” set to font weight of “Medium” and a font size of “14”. I enable “Anti-aliased” and disable “Ligatures”
First remove any existing Neovim configuration:
rm -rf ~/.config/nvim
rm -rf ~/.local/state/nvim
rm -rf ~/.local/share/nvim
Then clone NVChad and start Neovim. It will automatically start installing Plugins. Wait for the plugins to finish installing:
git clone https://github.com/NvChad/starter ~/.config/nvim && nvim
When the installation finishes inside Neovim, run:
:MasonInstallAll
Then exit and reopen Neovim.
3. Install Language Servers
Inside Neovim, run:
:Mason
Press / to search for these packages and press i to install:
- Python:
pyright,black,flake8 - JavaScript/TypeScript:
typescript-language-server,prettier,eslint_d - Go:
gopls,gofumpt,golangci-lint - Rust:
rust-analyzer,rustfmt,clippy
Note: typescript-language-server is supported by NVChad, its refered to as ts_ls. Additionally, not all LSPs are supported by NVChad, as they have to be supported by nvim-lspconfig. See nvchad lsp doc and configs.md. The second link shows that ts_ls is an alias for typescript-language-server.
Note: for each language, we install an LSP, formatter and linter from Mason.
– Python LSP: pyright
– Python Formatter: black
– Python Linter: flake8
– JS LSP: typescript-language-server
– JS Formatter: prettier
– JS Linter: eslint_d
– Go LSP: gopls
– Go Formatter: gofumpt
– Go Linter: golangci-lint
– Rust LSP: rust-analyzer
– Rust Formatter: rustfmt
– Rust Linter: clippy
4. Configure Neovim for LSP
After installing with Mason, you must enable the servers in your NVChad config. One clean method is to list them in the configs/lspconfig.lua file.
Example
Open ~/.config/nvim/lua/configs/lspconfig.lua and locate this section:
-- load defaults i.e lua_lsp
require("nvchad.configs.lspconfig").defaults()

local lspconfig = require "lspconfig"

local servers = { "html", "cssls", "gopls", "rust_analyzer", "pyright", "ts_ls" }
local nvlsp = require "nvchad.configs.lspconfig"

for _, lsp in ipairs(servers) do
  lspconfig[lsp].setup {
    on_attach = nvlsp.on_attach,
    on_init = nvlsp.on_init,
    capabilities = nvlsp.capabilities,
  }
end
Here, we simply added "gopls", "pyright", "rust_analyzer", and “ts_ls” to the existing servers array. With that in place, the LSPs should work as soon as you open the corresponding file types in Neovim. Note: only the LSPs supported by configs.md (see link above) will work.
Exit neovim. Open neovim against a test golang or python file to make sure it works. Note you can cycle through suggestions with Ctrl-n and Ctrl-p and select with Tab.
You can confirm everything is working with:
:LspInfo
and
:messages
5. Get GitHub Copilot for NVChad
Note: You need Node.js version 18 or newer. Check out https://nodejs.org/en/download.
- Install the Copilot plugin by editing
~/.config/nvim/lua/plugins/init.lua. Copilot will start the installation when neovim is opened again. Important: At the end and inside of thereturn { ... }block, add:
   -- Enable Copilot
   {
     "github/copilot.vim",
     lazy = false,
     config = function()
       vim.g.copilot_no_tab_map = true
       vim.g.copilot_assume_mapped = true
     end
   }
- Remap Copilot acceptance so that Ctrl-l is used instead of
Tab(NVChad uses<Tab>already). In~/.config/nvim/lua/mappings.lua, add:
-- Copilot Suggestion Acceptance Key
map('i', '<C-l>', function ()
    vim.fn.feedkeys(vim.fn['copilot#Accept'](), '')
end, { desc = 'Copilot Accept', noremap = true, silent = true })
Run :Copilot inside Neovim, follow the prompts. Note the “one-time code” provided in the messages area. A browser will open to Github’s authentication page. Authenticate with the account that uses Copilot and input the “one-time code”.
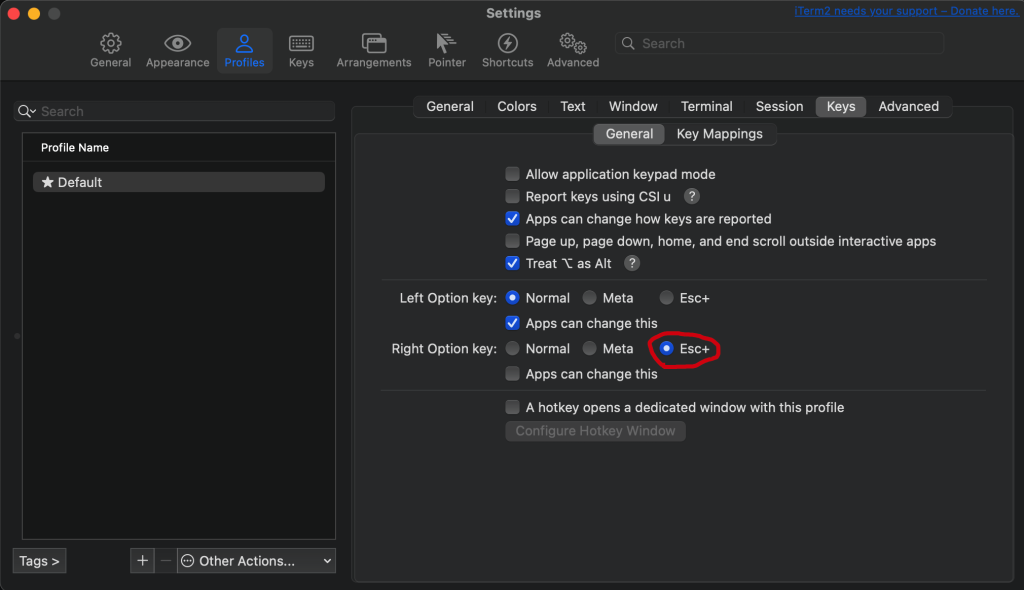
Important Extra Step and Info: Copilot shows one suggestion at a time. However it can show more. To enable cycling through Copilot suggestions using Right Option-[ and Right Option-] on macOS (or Alt-[ and Alt-] on Linux), set the right Option key to “Esc+” in iTerm2 (Preferences > Profiles > Keys), leaving the left Option key’s default functionality intact for versatility, while the right Option key is chosen for convenience and ease of typing.

6. Add Theme Picker
NVChad has a built-in theme picker. To enable a shortcut for it, add this to ~/.config/nvim/lua/mappings.lua:
-- Theme Picker Key
map("n", "<C-t>", function()
    require("nvchad.themes").open { style = "compact" }
end, {})
Reload Neovim and press Ctrl-t in Normal mode to open the theme picker. Use Ctrl-n and Ctrl-p to navigate, and press Enter to select a theme.
Note: I picked dark_horizons
7. Change Copilot Suggestion Color
By default, Copilot suggestions can be hard to see as they look similar to the comments. You can adjust the highlight colors by appending the following to ~/.config/nvim/lua/options.lua:
-- Copilot Suggestion Colors
vim.api.nvim_set_hl(0, "CopilotSuggestion", { fg = "#83a598" })
vim.api.nvim_set_hl(0, "CopilotAnnotation", { fg = "#83a598" })
9. Optional – Fix Clipboard Copy / Paste for Windows WSL
Append to the end of ~/.config/nvim/lua/options.lua:
-- WSL clipboard
vim.g.clipboard = {
  name = 'WslClipboard',
  copy = {
    ['+'] = 'clip.exe',
    ['*'] = 'clip.exe',
  },
  paste = {
    ['+'] = 'pwsh.exe -c [Console]::Out.Write($(Get-Clipboard -Raw).tostring().replace("`r", ""))',
    ['*'] = 'pwsh.exe -c [Console]::Out.Write($(Get-Clipboard -Raw).tostring().replace("`r", ""))',
  },
  cache_enabled = 0,
}
8. Summary of Changes
After installing Neovim and NVChad, these are the files that might have been updated in ~/.config/nvim:
lua/configs/lspconfig.lua– lists the servers you want to use.lua/mappings.lua– custom key mappings (Copilot acceptance, theme picker).lua/options.lua– custom options (Copilot suggestion colors).lua/plugins/init.lua– additional plugins (e.g.,github/copilot.vim).